| [ Bipolar chopper stepper driver ] [ Stepper motor for sale ] [ LCD-s léptetőmotor vezérlő ] |
Telescope focuser controller User Guide
8 button, LCD and LX-200
Ábel István ©2007
ai1@freemail.hu
ai1@freemail.hu
I made a small standalone stepper motor controller for www.umatelescopes.com ( István Zentai ). The following is a brief description of the device. If you own a piece of this electronics, and you have any problem with the controller you are welcome to contact me directly. If you want a modified hardware and/or firmware version for different purposes you are also welcome to contact me directly, but if you would like a piece of this hardware for your telescope please contact István Zentai first at www.umatelescopes.com, this page is also available in hungarian.
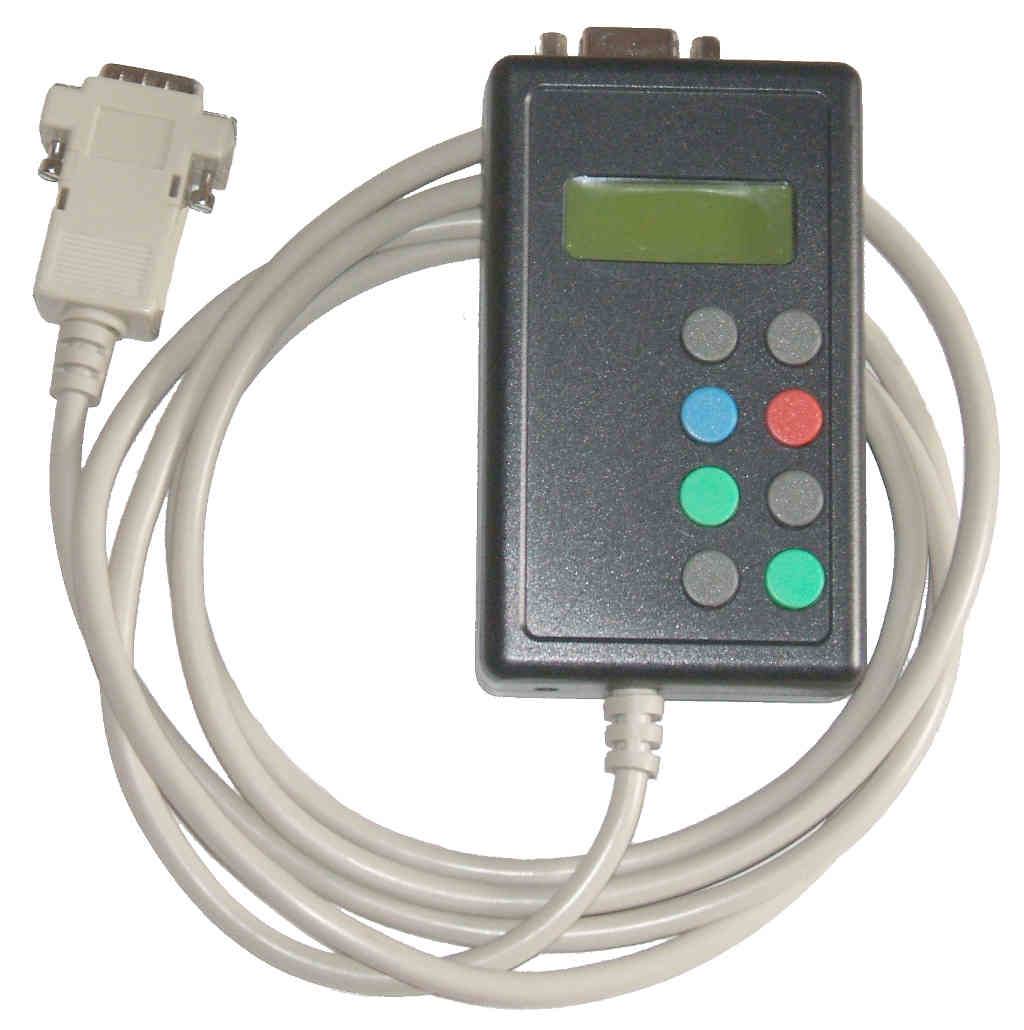
Table of Contents
- Power requirements, motor characteristics, connections
- Button arrangement
- Configuration detailes, accuracy
- Serial communication, LX-200 commands
- Power switch, standby mode
- Speed selection
- Pushbutton functions
- Starting the device
- Setup and service functions
Power requirements, motor characteristics, connections:
- the controller drives unipolar 12 V stepper motors from nominally 12 V car batteries
- no current control is done in the device, the motor has to be unipolar 12 V type or a proper serial resistor has to be installed into the motor circuit
- max. current to the motor phases are 500 mA / phase, max. two phase at a time
- motor drive is in half step mode
- car battery input is a 3.4 mm DC power connector
- input voltage is polarity protected, internal overcurrent protection is done with a fast blow fuse with 1A/F rating
- a limit switch signal back from the telescope to the controller implemented to indicate zero position in normal mode, limit switch input is overvoltage protected up to 24 V, limit switch has to be normally open, closed only when position is reached, the signal line is internally pulled up to 5 V by a 10k Ohm resistor, the limit switch has to pull the signal line to gnd when actuated
- output to the telescope is a cable with a length of 1.5 m with a SUBD9M connector, it carries 2x power, 4x motor phase, gnd and limit switch signals
To ease user information, the controller is fitted with a 2 line by 8 characters backlighted dot-matrix LCD display module, to display position and other informations. The device has 4 main buttons (HS),(LS),(+),(-) and 4 number buttons (1)..(4)
Button arrangement is the following:
  [ low speed, gray, ( LS ) ]   [ high speed , gray, ( HS ) ]
  [ minus, blue, ( - ) ]        [ plus, red, ( + ) ]
  [ one, green, ( 1 ) ]         [ two, gray, ( 2 ) ]
  [ three, gray, ( 3 ) ]        [ four, green, ( 4 ) ]
The 8 buttons has various functions during average usage, and there are some special button combination for startup only usage to ease setting to a new installation.
The buttons are software filtered against too fast state changes
The device has a microcontroller to keep track of all the movements, to stay inside telescope allowed movement range, the following features are implemented:
- in addition to the external hardware limit switch, what has to be set on the (-) direction movement, the firmware implements a separate (-) and (+) software limit switch, during normal movements, if set up correctly, only the soft limits are reached
- the firmware implements 4 internal storage place for addressed movement, you may save 4 positions to easily move into, on demand, with a single push of one of the 4 number buttons
- all positions and the current position is stored in 24 bit format, this means a maximal addressable movement range of cca. 16 million increments
- internal zero position is assumed to be the (-) direction hard limit switch, all positions are assumed to be above this, no negative positions are allowed.
- startup zero position determination by default is done by driving the motor back to hardware limit switch, and setting zero position there
- position display is 8 digit wide, internally updated 24 bit position from 0 to cca. 8 million is displayed as a 7 digit number and a leading zero, from cca. 8 million to cca. 16 million as a 7 digit negative number and a minus sign, this configuration allows continuous counter representation around zero
- to ease usage with telescopes where limit switch installation is not possible, B-mode ( detailed later ) is implemented in firmware
- user settings are stored in non-volatile memory ( eeprom ), software limit switch positions are also stored there, to store current position as a software limit switch hold (HS)+(LS)+(+) for 4 seconds if you want to set upper limit, or hold (HS)+(LS)+(-) for 4 seconds to set lower limit switch
- in limit switch storage function no calculation is done whether the lower limit is below upper limit and vice versa, this means if you set lower limit above upper limit and startup the controller in normal mode, sooner or later you will stuck into a position, because lower limit won't allow (-) movements and upper limit won't allow (+) movements
To make it possible to command the controller from a PC, or any other device capable of sending serial commands, it has an RS-232 communication interface.
- communication format is 19200 baud, 8 bit, 1 stop bit, no parity, no handshake
- only two wires of a SUBD9 standard serial connector is necessary, the GND pin and the TX pin
- connecting cable is a serial port extender cable, one end with a SUBD9F, the other end with a SUBD9M connector, when choosing from a PC parts retailer's selection ask for a cable with pins that are wired number by number.
- implemented protocol is LX-200 compatible focuser control commands
The valid commands are
   ':FS#' - select slow speed
   ':FF#' - select fast speed
   ':F+#' - start movement in (+) direction
   ':F-#' - start movement in (-) direction
   ':FQ#' - stop movement
- this command set is fully compatible with "astrosnap" software
- the communication interface is powered down on startup, the power on / power off state may be changed with a button combination (HS)+(1)
- the powered on state is indicated on the LCD display
Power switch, standby mode
- power to the LCD module, to the RS-232 interface, and to the motor are software switchable, after the initial power on you may set the device into stand by mode, and wake up from it
- in stand by mode RS-232 interface, LCD module, and motor are turned off completely, the processor is not turned off, current consumption is reduced, from a nominal 1 A current, down to cca. 17 mA
- the active / standby mode may be changed with a button combination (HS)+(4), in standby mode only the (HS)+(4) button combination is accepted, and the all buttons released state
Speed selection
The device has two preset selectable and changeable movement speeds, high speed and low speed respectively. Use (HS) to select high speed, (LS) to select low speed, and combinations with (+) (-) to change the preset speed values ( detailes below ), to store the changed speed values into non-volatile memory ( for next session ) hold (HS)+(LS) for 2 seconds
Pushbutton functions
Pushbutton functions during normal usage are the following, when 2 or 4 sec also noted you have to hold the button / button combination for the given time to select the function
   Pushbutton functions of main buttons:
     0 - buttons released - nothing to do, complete
     1 - (+) is pushed - move to (+) with current speed if not limit switch
     2 - (-) is pushed - move to (-) with current speed if not limit switch
     3 - (HS) is pushed - select high speed
     4 - (LS) is pushed - select low speed
     5 - (HS)+(+) is pushed - adjust HS speed (+)
     6 - (HS)+(-) is pushed - adjust HS speed (-)
     7 - (LS)+(+) is pushed - adjust LS speed (+)
     8 - (LS)+(-) is pushed - adjust LS speed (-)
     9 - (HS)+(LS) is pushed, 2 sec - store HS,LS to eeprom
    10 - (HS)+(LS) + (+) is pushed, 4 sec - store (+) limit
    11 - (HS)+(LS) + (-) is pushed, 4 sec - store (-) limit
    12 - (1)(2)(3)(4) is pushed - select stored position 1..4
    13 - (HS)+(LS)+(1..4) is pushed, 4 sec - store position 1..4
    14 - (HS)+(4) is pushed - standby mode
    15 - (HS)+(1) is pushed - turn on/off RS232 mode
There are two special pushbutton combination of main buttons:
    16 - (HS)+(2) is pushed, 4 sec - to change between normal mode and B-Mode
    17 - (HS)+(3) is pushed, 1 sec - move to zero position in B-Mode, and standby
- Normal mode is the default startup mode, when the controller seeks the hard limit switch during startup, sets zero position there and moves back into the position when power was applied to the device
- B-Mode is implemented - in request from István Zentai, to be able to handle telescopes where it is not possible to fit a hard limit switch. In this case the controller assumes that when the power is applied to the device, the telescope is in zero position. No limit switch search is carried out in this mode, You are only allowed to disconnect power from the device if you activated move to zero function (HS)+(3) previously. If you disconnect power from the controller while not in zero position, you will have to manually set the zero position again.
- If it is possible to fit a hard limit switch into the telescope don't use B-Mode
Starting the device
Connect the motor cord to the motor connector, connect RS-232 cable to the PC if you will perform remote controll, and finally connect the 12 V battery voltage to the power connector.
When DC power is applied, internal microcontroller powers up, but other circuitry is powered down yet. To turn on the device: push any of the buttons for a brief time. After the first sensed button push you have approximately 0.8 sec to reach desired startup button combination. In not a valid startup combination, or necessary hold time is detected, the device will power up in normal startup mode. If you hadn't succeeded to enter into desired startup mode, then you have to pull DC connector from the device and connect it once more.
Pushbutton functions during startup:
 (+)+(-) is pushed, more then 2 sec - no software limit sw sense
 (HS) is pushed during startup, more then 2 sec - no init, no soft
 (HS)+(LS) is pushed, more then 2 sec - no soft,hard limits, no init
 (HS)+(LS)+(+)+(-) is pushed, more then 4 sec - is pushed, more then do factory reload
These special functions are to correctly setup new installations:
Setting soft limits out of currently stored soft limit range
If the new installations requires greater movement range then permitted by default software limit switches, this can't be set during normal movement because active soft limit switches doesn't allow you to drive over range, those you can not store extended limit switch positions into non-volatile memory for future use. The device to be capable to correctly track positions, has to have a valid internal position counter. The internal position counter is valid if the device on startup seekes the hard limit switch and finds zero position. This means: to set the soft limits out of current range you have to startup the device in no soft limit switch sense mode, but with hard limit sense, and init movements, for these purpose you have to use (+)+(-), 2 sec startup button combination.
No init startup
If for some reason, you don't want during startup the device to seek zero position ( init ) for example because it is too far from current position, but you know the hard limit switch is functioning correctly, you may startup with (HS), 2 sec button in no init mode. The correctly functioning hard limit switch will prevent driving off range in (-) direction, but no limit will be applied to (+) direction movements. In this mode no position information is valid, those no addressed movement will be correct. Storing positions, limit switch or addressed movement, in this mode will result faulty settings.
Bare startup
If you know your hard limit switch is not functioning correctly then you may startup the device in bare movement mode with (HS)+(LS), 2 sec buttons. In this mode movement is possible, but position information will not be valid, and nothing will prevent you from driving off range either (-) or (+) direction.
Factory reload
If you completely mess up settings, and you would like to start setup from the beginning, you may want to reload factory defaults, to achieve this hold (HS)+(LS)+(+)+(-) for more then 4 seconds during startup. These defaults are not for the given telescope but for the controller, don't expect telescope fitted factory default values. The factory reload will not change the controllers Normal / B-Mode setting.
Changing the contrast of the LCD display
The contrast of the LCD display is set by a small potentiometer on the bottom side of the circuit, to access this you have to unscrew the RS-232 interface connector's screws, open the enclosure, and unscrew the circuit holder nuts. This adjustment is not for everyday use, don't proceed unless it is absolutely necessary.
You may use with this controller the 8 V robotron stepper motors available from me with additional resistors.
Don't forget to check www.umatelescopes.com for telescope hardware.
You may comment this page in email, or by phone +36 (29) 351-678 in the evenings ( usually ) central european time.
| [ Főoldal ] [ Térburkolatok ] [ Üllői vízmű ] [ Modellezés ] [ Úszómedencék ] [ Minolta AF5000 ] [ Habvágás ] |
| [ Bipolar chopper stepper driver ] [ Stepper motor for sale ] [ LCD-s léptetőmotor vezérlő ] |
|
|
|